Showing posts with label tutorial. Show all posts

Monday, June 25, 2012

iPad Flip Case and Stand Tutorial

My dad is the most impossible man to shop for EVER.  Anything he wants he just goes out and gets for himself.  For Father's Day, I wracked my brains for a long time to figure out what to give him.  Since he's obsessed with the tablet he purchased last year and has a very boring slide-in cover for it, I figured one of these would be perfect.


Unfortunately, they're expensive and not all that unique.  Now, if you have a boring, run of the mill dad then that might be fine, but my dad is responsible for some of my best party stories, so one of those wasn't good enough.


I couldn't find any free tutorials on this online, so I just made one.  Naturally, I forgot to take pictures of the process because I threw it together in a couple of hours the night before.  You get a lovely mix of actual (but crummy phone) photos and computer drawings.  I ask that you only use these for personal gifts, because I'm not making any money by posting the tutorial here.  Enjoy!


Materials:


1. Two kinds of fabric.  1/4 yard of each should do it.
2. Scissors.
3. Rotary cutter (you can also just use scissors)
4. Measuring device of some kind.
5. Rotary cutting mat.
6. Utility knife.
7. Roll of adhesive craft magnet.
8. Square (optional but handy)
9. Embroidered letters for monogramming.
10. Tablet, or if you don't have the tablet, a cardboard mock-up as a template.
11. Chalk for marking.
12. Elastic (optional-I didn't end up using it).
13. Vinyl floor tiles.  These go for between 35 and 99 cents each at home improvement stores, depending on how rigid they are.  You decide what works best for you.
14. Sewing machine and matching thread.
16. Iron and ironing board.

Assembly:
1. Measure your tablet.  If you're making it as a gift and don't have the tablet, make a cardboard template.
2. Cut four pieces of fabric 1.5-2 inches larger than your tablet, two pieces with a length that matches the pieces you just cut and a width about 2/3 of what you just cut, and four squares about 1/4 the size of your first four pieces. The color combo is up to you, but you can see how these are laid out below (pieces are numbered for future reference):


3. Cut your squares in half diagonally to form 8 triangles.  Place the triangles right sides together and stitch according to the diagrams below:

4. Press the seams open, then fold wrong sides together and press flat.

5. Pin the triangles in place on piece #3, right sides up.  If you want to use elastic along the edges for extra tablet security, pin that in place now.
6. Lay out your odd numbered pieces as shown below.  Stitch 1 to 3 and 3 to 5, RIGHT SIDES TOGETHER.


7. Press the seams open.


8. Repeat steps 6 and 7 using your even numbered pieces. 

9. You now have two sides that look the same except for the corner pieces.  Place them RIGHT SIDES TOGETHER and stitch 3 sides.  Leave the top side open.


10.  Clip your corners and turn right side out.  You might need to poke the corners out.  You should now have something that resembles a pillowcase.

10.  Measure how large each of your 3 sections are and subtract 1/4 inch from both the length and the width.  Cut your vinyl floor tiles to those measurements.  (To cut a vinyl floor tile, just score it with your utility knife and then bend it to "break" it.  It's extremely easy.  Leave the paper backing in place, because they're hard to handle when sticky).

***UPDATE***

I made an error here. See that top section?  You're actually going to use two separate vinyl pieces for that.  The one nearest the end is a very narrow strip that is the same size as your magnetic strip.  So you can still use your measurements, then add the magnetic strip and simply cut that section free.  Does that make sense?

11. Cut magnetic strips to the length of the vinyl pieces and place them on the tiles as shown below.  (Back side refers to the side you're not looking at when you can see the corner pieces).

12.  Slide the bottom vinyl piece inside the case and top stitch along your previous seam between pieces 3 and 5.  Slide the middle section of vinyl in and top stitch along your previous seam between pieces 1 and 3. Slide in your third section and top stitch again. A zipper foot makes this top stitching a lot easier, since the vinyl creates a sort of ridge between sections.

13. Fold over the top (not sewn) edge and press.  Trust me, this makes it easier.  Slide in your last piece of vinyl (the very narrow strip with the magnets on it) and stitch the top edge closed, sewing as close to the edge as possible.


 14. You can now fold your case closed (the magnets should catch and hold it in place) and decide where you want to place your monogramming (optional).  If you're using those embroidered letters, just follow the directions on the package.

15. You can fold this out into a stand, as shown below.  The magnets will catch to hold everything together.  And if you're worried about magnets affecting your tablet, consider that these are the magnets rated a 2 out of 10 on magnetic strength by the craft store.  It's hard to get them to stick to the fridge.  They'll do the job for this project, but they're probably not going to damage anything.  I say probably, of course, because I'm not responsible if they do cause damage.


 The tablet should slide into the corner pockets.  My dad didn't have his tablet with him on Father's Day but he tells me it fits perfectly and he loves the case.

If you liked this tutorial, please share!


Monday, April 2, 2012

DIY Retro Robot Lamp

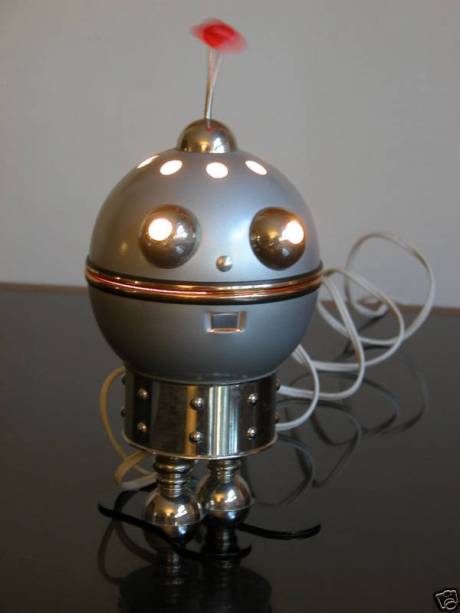
Over our two week school intercessions, I need things to keep me occupied.  This time, I decided I needed a reading lamp for my living room but didn't find anything unique enough.  I wanted something that looked like it belonged in the space age, and a Google search led me to this:
Unfortunately, these things are as expensive as they are hard to find.  I looked at it and thought, "I could make that!"  If you want to make your own, here are the materials* you need:

-A cylindrical metal container with a bottom, like a cup or bowl
-Two metal bowls of the same size
-Three smaller metal objects, at least two of which are the same size (for the eyes and top of the head)
-A spring (optional, for the antenna)
-Two round drawer handles with necessary hardware
-1/2" long machine screws (with nuts)
-1 roll galvanized pipe strapping (found in the plumbing aisle)
-Lamp kit with cord and socket
-Duct or electrical tape (optional)
-Drill with different sized bits
-Screwdrivers
-Pliers
-Superglue, metal epoxy, or similar
-A paintbrush you don't care about
-Eye protection
-Gloves

I didn't take pictures as I went (sorry!), but here are the steps and pictures of the final product so you can see how it's put together.


1. Drill all of your holes. Drilling metal is dangerous and tricky.  Wear gloves and eye protection, and work over a fire-proof surface like concrete.  Expect hot chunks of metal to fly and protect exposed skin accordingly.  In your cylindrical container, drill 6: two for "feet", one for the lamp assembly itself, one for the cord, one for the pull chain of the lamp assembly, and one for the "kickstand" you'll put in the back to stabilize your robot.  In one metal bowl, drill 5: two for "eyes", one for the top of the head, one between the eyes and near the lip of the bowl, and one directly across from the last one.  In the bowl that will be the bottom, drill two holes near the lip of the bowl in the same locations as the other one.  


2. Make a very large hole in the bottom of the last bowl-basically you're removing the bottom.  I accomplished this by using the largest drill bit I had and drilling several holes close together.  Then I used pliers to sort of rip the rest of the bottom out.  It wasn't perfect, but it worked.  If you're worried about the sharp metal edges, cover them with some tape. 

3. Add the robot's feet by screwing your drawer handles in place.  There will likely be too much space between the handle and the body of the robot-fill it with nuts or washers. Cut a 2-3" piece of the pipe strapping and screw it to the body of the robot with a machine screw.  Bend it to form a kickstand.

4. Remove your lamp kit from the packaging and familiarize yourself with the directions.  Remove the pipe and cap from the bottom of the socket.  Thread the following onto the cord in this order: nut and washer if you need it, pipe, body of robot (cylindrical container), washer if you need it and nut.  Tighten the nuts on either side of the pipe; you don't want too much sticking out of the bottom.  

5.  Thread the socket cap onto the cord and tie an underwriter's loop with your two wires above the cap.  

6.  Loosen the terminal screws on the socket.  Find the wire that is either white or covered in a ribbed coating, and loop the exposed end around the SILVER terminal screw and tighten.  Attach the other wire to the BRASS screw in the same manner.  Fit the socket back together and screw it onto the end of the pole.  

7.  Disconnect the ball from the pull chain, thread the chain through the hole in the bottom of the robot, and reconnect the ball.  Pull on it to make sure that it can move freely.  TEST THE SOCKET.  If it doesn't work the first time, try a different bulb.  Remove the bulb and set this portion aside.  

8.  Cut a 2" and a 3-5" piece of pipe strapping.  Attach the 2" portion to the bowl that will be the top of the head using a machine screw.  Use the hole that is at the BACK of the head-opposite the eyes.  Attach the other end of the pipe strapping to the bowl that will be the bottom of the head.  You want there to be very little space between the bowls.  This piece of pipe strapping is the hinge and it's easier to attach if you bend the pipe strapping "open" before attaching the second bowl. 

9.  Attach the longer piece of pipe strapping to the holes in the front of each bowl.  You may want to leave one side unattached until you are finished and put in the bulb, depending on how small your robot is.  This will allow you to open and close the robot's mouth to control the amount of light.  The pipe strapping will bend inward when the mouth is closed.

10.  Using your glue or epoxy, coat the edges of the eyes and the top of the head and adhere them over the holes you drilled.  Attach the spring or whatever you're using for the antenna.  Remember that you have to work quickly with this stuff, and whichever paint brush you use should be one you plan to trash when you're done.  Follow ALL of the directions on the package.

11.  Coat the top edge of the robot's body (where the light socket is) with the glue or epoxy and settle the robot's head onto the body.  Fill in any gaps and allow to dry.  

12.  Place your bulb in the socket, tighten up any loose screws, plug it in, and enjoy!  If you want more light, open the mouth.  Less light, close the mouth.  


I decided to try mine with a green bulb and really like the effect.


It goes perfectly on these shelves I found over the weekend.  After searching flea markets all day, I saw this  shelving unit sitting in someone's driveway with a "for sale" sign on it when I was driving home.  It's very solid (not particle board!) and the price was right.

This lamp fits right in with my odd collection of alien and retro stuff that I'm starting to accumulate, and with a regular bulb in it is perfect for reading.  Hooray!

*A word or two about the materials:

-Lamp kits are available at craft stores, but I recommend the hardware store.  Your selection of switch types will be limited at the craft store, and the kits often come pre-assembled with the wires already attached.  They aren't attached with screws and if you try to remove them to thread them where they should go in your final project, they'll break off inside the socket and you're out ten bucks.
-The bowls are hard to find in the right size.  I got mine at a thrift store.  
-The eyes and top of the head are salt and pepper shaker lids.  Again, thrift store.
-The body is an aluminum mug I found at the store.  I left the handle on in the back because it will make the lamp easier to move while in use (it will undoubtedly get hot). 


Saturday, December 25, 2010

Christmas Crafting

Miraculously, I finished the Christmas gifts I needed for today.

First, I made some ultra-conservative ties for my ultra-conservative dad. I only have a picture of one but it should give you a good idea:
This was my first venture into DIY screen printing, and there is a great tutorial over on Threadbanger. I'm not entirely thrilled with the precision of the printing, but it's decent. I need to play around with it some more. The screen was pretty simple to make using the tutorial's instructions, and all three ties that I used cost me a whopping $9 at Goodwill (yes, they do have some decent ties if you're planning to do something with them!) With all the hype about bedbugs, plus my own germ-o-phobia, I made sure to steam them before doing anything with them. (Note: steamer=worthy investment!)


The above gift was put together with the help of this lunch bag tutorial and this monogram canvas bag tutorial. If I had to make it again, I'd enlarge it. It came out smaller than I anticipated (and as a result, I have a TON of leftover fabric. Expect to see it used on future gifts). I made the inside spill-proof; this required a lot of thought but in the end, not much effort. I would have preferred to use oilcloth, but the only place you can find real oilcloth nowadays is online and I just didn't have the time to order it. Vinyl tablecloth fabric was another option, but I don't like any of it. You can make your own oilcloth by dipping fabric in linseed oil; however, I wasn't sure if the stuff I could get at the hardware store would be food grade, and apparently it has a tendency to spontaneously combust. So...I found some iron-on vinyl (made by Heat n' Bond Lite).

You can see that the bag contains a drawstring cover that tucks down inside of the bag, or makes it somewhat expandable:

Last but not least, I made a hoodie for a gamer friend:
I believe there was once upon a time a tutorial for this, but it's gone now. I just used the idea and ran with it. If you've never worked with freezer paper, I need to tell you that it is officially my new favorite crafting supply for good reason. First, it's cheap and can be found at the grocery store. Second, you can iron it so that one side sticks to your fabric and then use it as a stencil, or for paper piecing of quilts.

The above image is the stencil ironed on to the hoodie, so you are seeing a negative image. The final product is white paint on black fabric and looks pretty awesome! To make the stencil, I printed out the picture and lettering on three separate sheets of paper, arranged them and stuck them to the freezer paper with spray adhesive, and then cut out the negative areas with an exacto knife. The paper stuck on with the spray adhesive comes off pretty easily just by peeling-but it will fall right off when you iron anyway.

If you're wondering how I found all of these great tutorials, the answer is the Sew Mama Sew Blog. I check regularly, but especially in November when they publish their Handmade Holidays ideas. You can find this year's master list here. Previous years are definitely worth checking out as well!

Merry Christmas!

Related Posts Plugin for WordPress, Blogger...