Unfortunately, these things are as expensive as they are hard to find. I looked at it and thought, "I could make that!" If you want to make your own, here are the materials* you need:
-A cylindrical metal container with a bottom, like a cup or bowl
-Two metal bowls of the same size
-Three smaller metal objects, at least two of which are the same size (for the eyes and top of the head)
-A spring (optional, for the antenna)
-Two round drawer handles with necessary hardware
-1/2" long machine screws (with nuts)
-1 roll galvanized pipe strapping (found in the plumbing aisle)
-Lamp kit with cord and socket
-Duct or electrical tape (optional)
-Drill with different sized bits
-Screwdrivers
-Pliers
-Superglue, metal epoxy, or similar
-A paintbrush you don't care about
-Eye protection
-Gloves
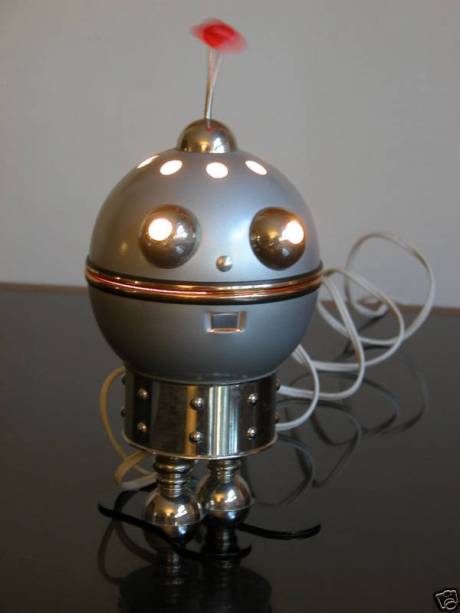
I didn't take pictures as I went (sorry!), but here are the steps and pictures of the final product so you can see how it's put together.

1. Drill all of your holes. Drilling metal is dangerous and tricky. Wear gloves and eye protection, and work over a fire-proof surface like concrete. Expect hot chunks of metal to fly and protect exposed skin accordingly. In your cylindrical container, drill 6: two for "feet", one for the lamp assembly itself, one for the cord, one for the pull chain of the lamp assembly, and one for the "kickstand" you'll put in the back to stabilize your robot. In one metal bowl, drill 5: two for "eyes", one for the top of the head, one between the eyes and near the lip of the bowl, and one directly across from the last one. In the bowl that will be the bottom, drill two holes near the lip of the bowl in the same locations as the other one.

2. Make a very large hole in the bottom of the last bowl-basically you're removing the bottom. I accomplished this by using the largest drill bit I had and drilling several holes close together. Then I used pliers to sort of rip the rest of the bottom out. It wasn't perfect, but it worked. If you're worried about the sharp metal edges, cover them with some tape.
3. Add the robot's feet by screwing your drawer handles in place. There will likely be too much space between the handle and the body of the robot-fill it with nuts or washers. Cut a 2-3" piece of the pipe strapping and screw it to the body of the robot with a machine screw. Bend it to form a kickstand.
4. Remove your lamp kit from the packaging and familiarize yourself with the directions. Remove the pipe and cap from the bottom of the socket. Thread the following onto the cord in this order: nut and washer if you need it, pipe, body of robot (cylindrical container), washer if you need it and nut. Tighten the nuts on either side of the pipe; you don't want too much sticking out of the bottom.
5. Thread the socket cap onto the cord and tie an underwriter's loop with your two wires above the cap.
6. Loosen the terminal screws on the socket. Find the wire that is either white or covered in a ribbed coating, and loop the exposed end around the SILVER terminal screw and tighten. Attach the other wire to the BRASS screw in the same manner. Fit the socket back together and screw it onto the end of the pole.
7. Disconnect the ball from the pull chain, thread the chain through the hole in the bottom of the robot, and reconnect the ball. Pull on it to make sure that it can move freely. TEST THE SOCKET. If it doesn't work the first time, try a different bulb. Remove the bulb and set this portion aside.
8. Cut a 2" and a 3-5" piece of pipe strapping. Attach the 2" portion to the bowl that will be the top of the head using a machine screw. Use the hole that is at the BACK of the head-opposite the eyes. Attach the other end of the pipe strapping to the bowl that will be the bottom of the head. You want there to be very little space between the bowls. This piece of pipe strapping is the hinge and it's easier to attach if you bend the pipe strapping "open" before attaching the second bowl.
9. Attach the longer piece of pipe strapping to the holes in the front of each bowl. You may want to leave one side unattached until you are finished and put in the bulb, depending on how small your robot is. This will allow you to open and close the robot's mouth to control the amount of light. The pipe strapping will bend inward when the mouth is closed.
10. Using your glue or epoxy, coat the edges of the eyes and the top of the head and adhere them over the holes you drilled. Attach the spring or whatever you're using for the antenna. Remember that you have to work quickly with this stuff, and whichever paint brush you use should be one you plan to trash when you're done. Follow ALL of the directions on the package.
11. Coat the top edge of the robot's body (where the light socket is) with the glue or epoxy and settle the robot's head onto the body. Fill in any gaps and allow to dry.
12. Place your bulb in the socket, tighten up any loose screws, plug it in, and enjoy! If you want more light, open the mouth. Less light, close the mouth.

I decided to try mine with a green bulb and really like the effect.


It goes perfectly on these shelves I found over the weekend. After searching flea markets all day, I saw this shelving unit sitting in someone's driveway with a "for sale" sign on it when I was driving home. It's very solid (not particle board!) and the price was right.
This lamp fits right in with my odd collection of alien and retro stuff that I'm starting to accumulate, and with a regular bulb in it is perfect for reading. Hooray!

*A word or two about the materials:
-Lamp kits are available at craft stores, but I recommend the hardware store. Your selection of switch types will be limited at the craft store, and the kits often come pre-assembled with the wires already attached. They aren't attached with screws and if you try to remove them to thread them where they should go in your final project, they'll break off inside the socket and you're out ten bucks.
-The bowls are hard to find in the right size. I got mine at a thrift store.
-The eyes and top of the head are salt and pepper shaker lids. Again, thrift store.
-The body is an aluminum mug I found at the store. I left the handle on in the back because it will make the lamp easier to move while in use (it will undoubtedly get hot).
No comments:
Post a Comment